From Zero to Full Game – Race 3D
Have you ever wanted to create a feature-packed 3D racing game from scratch, yet hesitated because it sounds complicated? Good news: with iterative development, AI-assisted prompts, and a bit of creativity, you can start with a simple “box on wheels” and gradually evolve it into a complete 3D racer. Race 3D is a real example that started small and—through 7 key versions—grew into a fun, multi-mode game powered by Three.js.
This tutorial shows the evolution step-by-step, referencing relevant snippets. You’ll find short prompt examples and short bits of JavaScript code. These examples are not the entire source—rather, they are pieces you can adapt for your own approach. For a full reference, see the code example below or incorporate your own AI or TypeScript setup to generate it piece by piece.
Overview of Evolution
-
Version 1: Minimal scene & controls (~140 lines)
- Basic Three.js scene (one box, one plane)
- Simple WASD steering
-
Version 2: Expanding the world (~780 lines)
- Larger track, lap logic, rudimentary UI
- Time measurement with
performance.now()
-
Version 3: Coin Rush Mode (~1000+ lines)
- Extra mode with randomly spawned coins
- Time-limited collection challenge
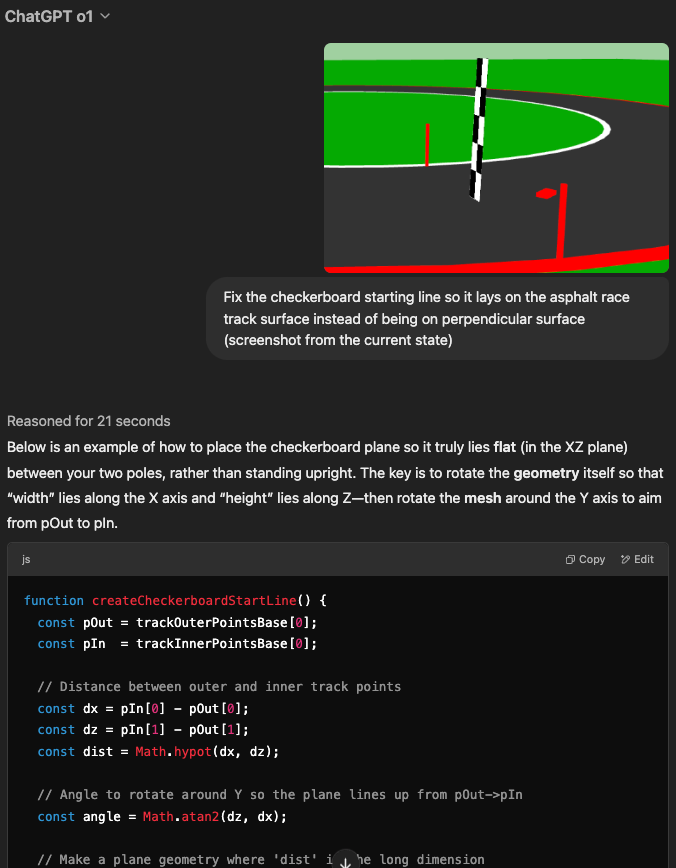
- Encountered bug with checkerboard pattern—ultimately solved via screenshot-based prompt
-
Version 4: Adding Textures & Models
- Replaced placeholders with
.gltfassets - Introduced grass, asphalt textures, real car model
- Replaced placeholders with
-
Version 5: Settings & Restart UI
- In-game overlay for adjusting parameters (speed, laps, etc.)
- Added a single-click “Restart”
-
Version 6: Scenery & Shadows (~2000+ lines)
- Trees, bushes, better lighting (shadowMap, directional light)
- Performance considerations
-
Version 7 (Final): “Redline” Mode & Polished GUI
- Infinite-acceleration “Hell Circle”
- Overhauled menu, scoreboard, multi-mode game jam structure
- Demonstrates how to split big tasks (like UI) into multiple prompt-sprints
Step-by-Step
Version 1 – Minimal Racing Prototype
Focus on the absolute basics:
Create a minimal Three.js scene with a red box as the car, a plane as the ground, and WASD steering.
Use OrbitControls so I can freely move the camera.
Key Mechanics
scene,camera,renderersetup- A single
BoxGeometryfor the car - WASD event listeners to move forward/back and rotate left/right
Short Sample Snippet (under 10 lines):
const scene = new THREE.Scene();
const camera = new THREE.PerspectiveCamera(75, window.innerWidth/window.innerHeight, 0.1, 1000);
const renderer = new THREE.WebGLRenderer();
document.body.appendChild(renderer.domElement);

// Minimal Car
const carGeometry = new THREE.BoxGeometry(2,1,4);
const carMaterial = new THREE.MeshBasicMaterial({ color: 'red' });
const car = new THREE.Mesh(carGeometry, carMaterial);
scene.add(car);
Total: ~140 lines once you add inputs, animation loop, etc.
Version 2 – Expanding the World
With the foundation set, expand to a bigger track, lap logic, and timing:
Enhance the prototype: add a bigger track, keep track of laps, and show the user’s lap times in a corner overlay.
New Features
- A donut-shaped track (or a large rectangle)
- Simple lap detection (e.g. crossing an invisible line)
- Timer logic with
performance.now() - Code size: from ~140 lines to ~780 lines
Important Note
Keep UI overlays minimal at first. Even a
<div id="lapInfo">with text updates is enough to get started.
Version 3 – Introducing Coin Rush
Add a fresh game mode to keep things interesting:
Add a ‘Coin Rush’ mode that spawns coins randomly on the track for 60 seconds. Let me choose between ‘Race Mode’ and ‘Coin Rush’ at the start.
Challenges & Insights
- Encountered a checkerboard texture bug on the start line. Prompt-based attempts failed until a screenshot was provided.
- Visual debugging can surpass text-based descriptions for tricky geometry or texture issues.
- This stage highlights that AI might guess incorrectly on layout questions unless you show it a picture or precise coordinates.
Version 4 – Models & Textures
Time to replace placeholders with real 3D models:
Use a
.gltfmodel for the car, add an asphalt texture for the track, plus a grass plane for the environment. Provide a fallback if the model fails to load.
Key Upgrades
GLTFLoaderfor modelsTextureLoaderfor grass, asphalt, or other surfaces- Ambient and directional lighting for a more realistic look
Short Sample Snippet (loading a .gltf model under 10 lines):
const loader = new THREE.GLTFLoader();
loader.load('car.glb', (gltf) => {
  const carModel = gltf.scene;
  // Scale, rotate, and add shadows
  carModel.scale.set(0.5,0.5,0.5);
  scene.add(carModel);
});
Version 5 – Settings & Restart
Make your game tweakable:
Create an overlay to adjust max speed, laps, time limit, and add a ‘Restart’ button that resets everything.
Things to Watch Out For
- Fully resetting the game state:
- Car position & speed
- Timer variables
- UI overlays
- Avoid leftover intervals or event listeners from the previous run
Version 6 – Trees, Bushes & Shadows
Boost immersion with environment objects:
Place random trees around the track, add cylindrical trunks, conical leaves. Use
renderer.shadowMap.enabled = truefor dynamic shadows.
Performance Considerations
- Large geometry counts can tank framerates
- If you notice drops, try frustum culling or simpler geometry
- Directional shadows can be expensive; reduce
mapSizeor switch to a less resource-intensive shadow approach
Version 7 (Final) – Redline Mode & Polished GUI
A new adrenaline-filled mode plus final UI touches:
Add a ‘Redline/Hell Circle’ mode with infinite acceleration each lap. Overhaul the menu with bigger animated buttons and a scoreboard.
What’s New
- Multiple cameras (chase cam, overhead, minimap)
- Smoother user flows (start menu, pause, game over)
- Advanced tip: break huge UI tasks into multiple smaller prompts. AI handles better if you present them in steps rather than one giant request.
Practical Considerations
-
File Organization
Keep a single HTML file (for quick iteration), but consider separate.jsand.cssfiles, or a TypeScript setup for larger projects. -
Prompting Strategy
- Incremental: each new feature is a fresh mini-prompt.
- Bug Handling: if text-based fixes fail, attach a screenshot or a short video snippet. It helps AI see the exact glitch.
-
Debugging
- Use DevTools (Chrome, Firefox) for logs and live inspections.
- Let AI help by pasting in error logs or partial code, but confirm the fix in your environment.
-
Performance Tuning
- Lower texture resolution or geometry detail.
- Turn off shadows or reduce shadow detail if the framerate suffers.
Beyond This Tutorial
- Multiplayer: For real-time racing, integrate socket.io or WebRTC.
- Advanced Physics: Swap simple
y += speedwith libraries like Cannon.js or Ammo.js for realistic collisions/suspension. - Customization: Let your players design tracks or choose from multiple car models (paint shop, decals, etc.).
Game Upload
We accept every game request. If you have your first game, don’t be shy—upload it for free! You risk nothing by submitting. While not every submission makes the front page at ARCD.fun, why not give it a try? Upload now!
Conclusion
Race 3D exemplifies how a small concept (140 lines of code) can explode into a multi-mode 3D racer thanks to iterative AI-driven development. At each version, a concise prompt introduced new features—or fixed stubborn bugs (sometimes requiring screenshots!). By the end, you have:
- Multiple modes (Time Trial, Coin Rush, Hell Circle)
- Meshes & Textures (car model, environment, coins)
- UI Overlays (settings, restarts, scoreboard)
Key Takeaway
AI can be a powerful co-developer—especially when you chunk tasks into small prompts, use screenshots or direct code references for clarity, and keep your code modular.
Now it’s your turn: pick a genre—racer, platformer, puzzle—and use the same “prompt-sprint” approach to grow your simple prototype into a full-fledged game. Happy racing and happy coding!